Those of you in the biomedical/clinical engineering field who service sterilizers know that those four little words—”too long in charge”—can make grown men and women cry. The operator sees that error and instantly thinks of how many packs will need to be rewrapped, and how much further it will put the sterile processing department (SPD) behind schedule. While this article will not teach how to test and repair a sterilizer or boiler, it will provide tips on what to do when you see the words, “too long in charge.”

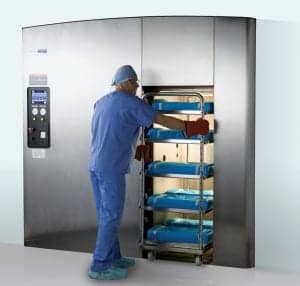
The jacket of the sterilizer is full of steam that is ready to charge the chamber—where the instruments are loaded—when the controller sends the command. Photo courtesy of Steris.
When you see those words, before going any further, read the printout to make sure you know where in the autoclave the failure has occurred. I have seen it, and it has happened to me. The operator who reported the failure did not give all the information, or the technician misunderstood.
The large vacuum sterilizers that hospital SPDs use have two compartments that are charged with steam. The outside compartment is called the jacket, and the inside compartment is called the chamber. The jacket is a shell built around the chamber. The chamber is where the end user loads the instruments for sterilization. The jacket should be full of steam that is ready to charge the chamber when the controller sends the command to do so.
If the charging failure occurred while the jacket is being charged with steam, there could be a steam leak. There is a possibility you would see steam leaking from the sterilizer since the only thing covering the jacket is the insulation. However, the first thing you want to look at is the pressure gauges on the steam supply line and the jacket. If the steam supply gauge shows very little pressure, you just found the problem—you do not have enough steam. If a steam plant on the hospital grounds supplies your steam, then place a call to your facilities department and explain the problem. If a steam generator (boiler) located near your sterilizer supplies your steam, you may find the boiler shut down due to low water failure.
Heating Elements and the Contractor
If the steam generator is having a hard time keeping up with the demand to charge the sterilizer, one of the heating elements may have failed, causing the boiler to struggle to keep up with the demand. A quick way to check to see if the elements are working is to use an amp clamp meter. While the unit is powered up and running, very carefully remove the cover panel, although, you may want to shut the power off when removing the panel because of high voltage, ranging from 208 to 480 volts. Once the panel is off and you have access to the wiring, and with the unit powered up and producing steam, you can put the clamp around each wire to measure the amps being drawn. If you find some of the wires do not have any amps, make note of it and continue checking all the wires going to all the heaters.
Once you have your results, trace the wires going from the heater to the contactor. The contactor uses low voltage to control high voltage. If you have heard a loud clicking or latching noise while a boiler is operating, that noise is the low voltage coil being energized latching the contacts for the high voltage to the boiler heater. What you need to do is check if the contactor is working. The coil in the contactor may be the problem. The contactor is usually overlooked during the scheduled maintenance; I replace them yearly. If you suspect there is a problem with the boiler, you may want to contact your facilities department for assistance or contact a local boiler vendor.
If you have found that the charge failure occurred in the chamber, then you may have a big job in front of you.
Your brain is probably now working on overload trying to figure out what could cause this problem. The first thing you do is run a leak rate to test your chamber. More times than not, the result of the test is, “insufficient vacuum to perform the leak test.” Now the fun begins, because you may have a leak—and you have the pleasure of working on a hot sterilizer.
Most techs begin by walking around the unit while it is charging the chamber, looking for steam shooting out of a fitting. If this does not pay off, then rebuilding the valves that are connected to the chamber would be a good path to take. If you find a broken spring or a damaged diaphragm in one of the valves, you may feel better knowing you have hard evidence for the source of the leak. So you fire the unit up again to run a leak rate, praying your hunch paid off. It has been my experience that 90% of the time you will have found the leak by this time, which makes you the hero for the moment.
Getting Creative
However, there is still a 10% chance that the leak is still there. You now need to step back and broaden your search. I have yet to find a sterilizer that you can run a diagnostic test on and have it print out what to replace. This 10% area is where your experience and understanding of how sterilizers work will assist you. I try to follow the approach of keeping it simple. The leak test is telling you that somewhere in the sterilizer air is being drawn in while the sterilizer is pulling a vacuum. One of the next places to check is to inspect the door seal and door diaphragm. Do not forget to check the threads of the bolts used to secure the door seal and diaphragm. The threads can be stretched from the pressure they endure, which can cause a leak. If after checking and replacing the door seal and diaphragm you find you still have a leak, then you need to get creative.
Since the unit is pulling air into the chamber while the sterilizer is trying to vacuum all the air out, then it only makes sense that putting pressure into the chamber while looking for the leak outside would be the best approach. However, the prevacuum cycle charges the chamber for only a few minutes at a time, which makes finding a leak very difficult. So what I do is select a gravity cycle, which keeps the chamber charged for up to 30 minutes, allowing time to inspect the sterilizer for the leak.
Finding the leaking steam represents the next problem you have to overcome. If it is a small hole, the steam will be invisible. What I have found works is a small inspection mirror. If you move the mirror around all the pipes and fittings while the chamber is under pressure, you should be able to find your elusive leak. The leaking steam will condense on the mirror, showing you the leak’s location. Again, concentrate on the piping that supplies steam to the chamber as well as measures the steam in the chamber, such as the pressure transducer piping. When you find that condensation appears on the mirror, you will want to take the mirror away, wipe it off, and put it back in the same spot to ensure you were not seeing things. If in fact you get condensation on the mirror again, you just found a leak. I suggest marking the location and continuing with your search. Once you have gone over the whole sterilizer and you feel that you have no more leaks to find, then it is time for the acid test, which is to run the leak test. After running it and finding the leak rate has passed, then you should take a step back and savor the moment because you have just conquered that elusive 10%.
If you do all the checks and the chamber appears to be tight, the problem could be the chamber does not have enough vacuum and times out. The older prevac sterilizers use a venturi design, which is dependent on the water supply. If the water supply is too low, the sterilizer will time out before reaching the correct chamber vacuum level. If the water pressure is too high, the venturi will not function properly. The industry standard for water pressure for a sterilizer is 30 to 50 PSIG dynamic. A good friend of mine once found the seat of the venturi had come out and found it farther down the water line.
If your sterilizer is a newer one, it may have a vacuum pump—three-phase pumps with low voltage controlled contactors—installed instead of the venturi design. If the pump has been recently replaced or removed for repair, check the wiring. If the pump has incorrect wiring, it will run backward and not provide the vacuum needed.
The heat exchanger—a piece of external equipment attached by piping to the sterilizer—is another part that can leak, but it may not be detectable from outside the unit. This elusive item works by pumping steam into many copper lines in the middle of the exchanger. The tubes are surrounded by water, which cools the steam down. If one of the copper tubes has a hole, it will suck water into the line. Since the copper tubes are full of steam that is being exhausted out of the chamber, there is a direct connection from the chamber to the hole, which prevents the chamber from being completely evacuated and shows up as a leak. The way to check the heat exchanger for a leak is to turn off the steam and water to the sterilizer, trace the steam and water lines, and identify what lines feed the steam and water to the exchanger.
Disconnect the steam line connection that is coming out of the heat exchanger, and then turn the water on. There is a good chance you will have to turn the sterilizer on to open the water valve; just ensure you have the steam supply valve turned off. If there is a hole in one of the copper tubes, then you will have water coming out of the steam connection that you disconnected. If you find it leaking, then you will have a big job in front of you of replacing the heat exchanger. I would suggest getting some help; it is much easier with two people working together on this major repair!
If you have tried all this and you still have a leak, then there is a good possibility that you have a cracked chamber wall. This repair will require hiring a boiler repair company that has the equipment to locate the crack and has certified welders to make the repairs. This can prove to be a costly repair, and you will need to involve the equipment department manager to decide if it is cost-effective to repair the sterilizer or replace it.
I hope these troubleshooting tips will help you to quickly and easily find and repair a leak in minimum time and return the sterilizer to service. Your operating room and sterile supply staff will appreciate your support of their area!
Jerry McEwen, CBET, BSMCL3, has been a biomed for more than 10 years and works at Oregon Health Science University in the OR shop. He has a class 3 boiler license, allowing him to work on boilers and sterilizers. For more information, contact .